When I first started this blog, I was an unemployed costumer attempting to create period gowns and costumes with very limited means. Although now employed, I still try to be as thrifty as possible. I am still "The Broke Costumer"!

In addition to posts about the outfits I make on a budget, this blog includes short research articles on fashion, history, accessories, styles, or whatever interests me at the moment.


I hope you enjoy my journey into the land of inexpensive costuming and short articles.


Sunday, October 20, 2013

Pagoda Handbag

A year ago I posted about Enid Collins purses and Jewel Tone Handbag kits.  My dream purse, numero uno on my wish list, was the black Pagoda bag.  All year long, I have been looking at flea markets, on Etsy and Ebay.  On the rare occasion I found it on line, it was way over my price range, $50+ for the finished bag.  I even bid on a few on Ebay, but again, it rose to over $50.  I thought I would never find one I could afford.

A few weeks ago while skimming through Ebay, I did a double take.  Someone was selling an unopened, shrink wrapped, complete 1967 Pagoda Kit!   It was listed in the embroidery kit section, not the purse section.  It had four days left and no bids.   I immediately put a maximum bid of $51.00 on it.  My bid was the first at $19.99.   There were no further bids on it until the last two minutes when someone put a bid in.  My auto bid came back with $28.00 - AND I WON!!!!

The seller even lives 30 minutes from me, so she mailed it to me Monday morning, and I received it Tuesday afternoon.  Tuesday night I cracked it open, eager to get started.  I am taking photos along the way.

 I opened the box and and checked out the contents.  The glue, over 50 years old, had turned brown, but was still liquid!  I won't use it, but will be using Aleene's Jewel It glue.    I read over the instruction sheet, which is starting to get brittle, and is browning.


Step one was to attach all the hardware to the purse.  I nailed tiny nails to secure the wooden bottom piece in.  Then I attached the clasp pieces.
 
The first jewels are attached!  It can get a bit messy with all the glue on tiny pieces.  I am afraid to use too little as I don't want the jewels to fall off.  I didn't do anything else that night, as I wanted what I did to dry.  So I had fun looking at the pristine catalog that was included in the kit!

Night Two:  Glued on the rest of the jewels.  Its turning out so cute!      

Night Three: The last step is to apply the gold braid on the roof.    This was the tricky part, as the cording ravels at the ends.  I dipped the ends in glue to keep them from raveling after I cut the braid.

Here is the finished purse.   My cell phone photos are awful, and this bag looks so much better in person.                                                                                                                                                                                                                                                                                                                                                                                                                                                                                            Addition:   I won a second jewel tone kit - Zodiac, unmade and in the box, for only $17!  That will be my next project :)  


Monday, August 26, 2013

Imitation is the Sincerest Form of Flattery

Marcus Aurelius said "Imitation is the sincerest form of flattery".  I greatly admire the beautiful creations of Arlene T.  I know her now, but back when I found this inspiration photo while surfing the net, I didn't know who made the original.  I just fell in love with it and saved it in the computer.  Look at this lovely day dress: 

I had it in my computer for over a year waiting for an event that required an Edwardian day dress.  In  April 2011 for our costume guild, I organized a Titanic Boarding Luncheon.  I posted the list of actual passengers for the members to choose from and made everyone badges of their passenger with their personal information on them.  After lunch everyone stood and introduced themselves and explained why they were on board, what class they were, and whether or not they survived.  This was my way of honoring the memory of those lost that dreadful night.

Anyway, I thought this was the perfect time to use my inspiration photo.  Being unemployed at that time, I had a very small budget.  on a road trip to Los Angeles fabric district, I found a cream cotton blend fabric with black and light tan thin stripes - for 99 cents a yard!!  I bought 5 yards, as I had not picked the pattern yet and didn't know how much yardage I needed, and at that price I was happy to have left overs.  I then had fun picking the trim.   I found a beautiful black floral lace for $1 a yard, a thinner black lace and some white lace, for 50 cents a yard.   So all total, I think I paid about $15-18 for this dress!  Its been a few years, which is why I am not breaking this one down.  But for under $20 I made a great dress.

I had the Edwardian Laughing Moon pattern from a previous dress, and thought I could change it up to look similar to the inspiration photo. Here is the pattern.   I made the blue dress without the over skirt, and added the  shoulder details from the the red, gold and white gown.  I used cream buttons up the back.    I didn't want to copy Arlene's dress exactly, so I did not add the lace under blouse or the trim covered belt.  Also, I made my skirt more column shaped rather than fuller like the original.

I wore the dress again a year later for the Titanic Exhibition at the Natural History Museum in April 2012, 100 years after the sinking.   Here are a few photos from that event.


I wore it again yesterday for our lovely afternoon at the Marston House.  We had a wonderful tour of the gardens given by our guild member Amy H. who docents there.  After the garden tour, we had a relaxing picnic on the lawn.  Afterwards, several of us continued on and took a tour of the  house itself, a beautiful craftsman style marvel, built in 1904.

Here I am again, although wrinkly from sitting on the lawn for a picnic.

Aren't my friends gorgeous? Once again, thank you to my Muse, Arlene, for this simple but elegant day dress.  I like it better than my fancier ones.


Thursday, August 8, 2013

Costume College Part 2 - Pirates of Penzance Tea


On Sunday afternoon of Costume College, I was the tea mistress for the Pirates of Penzance tea!  I don't normally blog about the events themselves, but I wanted to show a few pics of other guests' wonderful outfits.  The subtitle of the tea was "A Victorian Seaside Romp".  We had a mix of Pirates and Victorian Seaside dresses, and other fabulous costumes.

I would like to share some of my favorite costumes with you.  I wish I could post everyone that came, but I can't.


First, I will start with some of my favorite pirates!

Cute Debbie in pink and black with striped stockings.

Joanne (tea assistant) with the awesome red curls.  She will be tea mistress next year!

April in her beautiful blue coat.  She will be tea assistant next year.

Audrey and Shawn brandishing their pistols below.


For my tea dress, I wanted a Natural Form style gown, as the Pirates of Penzance takes place in 1879.  To save time I decided to use the white underskirt I had previously made to wear under my seafoam green skirt, but never used. Here it is again.  The pattern is is Truly Victorian 1878 Fantail Skirt.
I covered it in sheer white voile ruffles, yards and yards.
Over the ruffled underskirt, I made an overskirt from the 1880 Hermione overskirt pattern from blue and white striped seersucker.   For the bodice, I found a white on white striped voile and used pattern 1881 Dinner Bodice with some modifications.  I didn't want a solid white bodice, so I made a faux vest front by adding inserts of the striped fabric from the center dart up to the neckline. I made 3/4 sleeves with a band of the striped fabric at the cuff.  I lined the bodice (not the sleeves, which remain semi sheer) with the remnants of a white sheet I had in my stash.  When I go to thrift stores I buy flat sheets for $1-2 which are great for linings.  The white underskirt is a sheet as well!


Here are some photos of the finished outfit.

My pirate man Jerry and me!


The trim is little alternating navy blue and white flowers. There are two navy bows down the front where the pleats gather, and one navy bow on the back at my waist.


Cost Breakdown for dress:

$6.00   3 yards white voile ($2 a yard in LA)
$1.00   White sheet underskirt and bodice lining
$9.50   2 1/2 yards white stripe voile for bodice
$3.20    12 blue buttons
$2.50    5 yards trim (50 cents a yard at swapmeet)
$20.00  5 yards seersucker @ $4.00 a yard

TOTAL   $42.20

Monday, August 5, 2013

Costume College Part 1 - A Mermaid's Tale

Another wonderful Costume College!  This year I was thrifty and only made two new outfits for the weekend.  The first was for Thursday night's Mermaids and Sea Sirens pool party.  My friend Joanne Weikel and I decided to make matching mermaid skirts, and do something on our own for the top half.  We went to a wig store in town that was going out of business, and we each got red wigs for half price - mine straight and long with a beehive, and hers long and curly.

We took a trip to LA fabric district and found a pretty turquoise sequined fabric we liked.  We each paid $11 for our pieces.  Joanne had a dark blue shimmery fabric already that we used for the base.  I lined my skirt with an old aqua sheet.

We started with this pattern for the base. Butterick 4954.  Joanne drafted the body and tail on paper which she tucked into the waist of the finished skirt while I was wearing it.   We then laid the pattern down on the sequins and cut it out.   Once the sequin shape was cut, I laid it face down on a piece of scrap fabric I had and sewed it all around, leaving the waist open.  I then turned it inside out and it was similar to a giant applique.

I wanted the tail to hang freely at the bottom but it was too droopy, so after I hand sewed the  "applique" onto the front of the skirt, I tacked down the tail at a few points. I added some green sheer ruffle at the bottom for "seaweed".  In this picture, the waist sequins are just tucked into the waistband.

I wore a turquoise top I found at Burlington that had seaweed like ruffles on it.  I cut the sleeves off.  I added some shell necklaces I had, glued a starfish on to a plastic crown, tied a piece of left over green fishing net around my waist and hung a string of shells down the side of the skirt.

I got some matching flip flops and carried my 1960's seashell handbag (which went perfect with my 60s beehive).   Here are a few photos from the pool party taken by Jerry Abuan.


Unfortunately Joanne was not able to attend Costume College on Thursday night.  But here she is in her beautiful wig which she did get to use on Sunday at Costume College during the Pirates of Penzance tea.  This photo was taken by Debbie Boyd.
 Breakdown for this outfit:

$11.00     Sequined fabric

$10.00     Turquoise top
  $5.00     Jeweled flip flops

TOTAL    $26                      (Wig - $25 and can be used for other costumes)


For the rest of Costume College, I wore:

Friday Day:  Mourning costume previously blogged about for the 100 years of mourning fashion show put on by Valarie LaBore (She calls us a Murder of Crows). Photo by Mary Jennings.
 

Friday Evening Ice cream social (1950's garden party theme) - I wore this dress from the Bettie Page store. Look how cute April's outfit is!  


Saturday Day - Pirate!  This is an outfit I already had for Ren Faire.   Saturday night I wore my Dark Marie costume which is in the post before this one so I won't post any photos of it.


Sunday outfit gets a post of its own.  Costume College Part 2.   First I have to get the pics downloaded.  See you in a few days!.


Saturday, June 1, 2013

Dark Marie

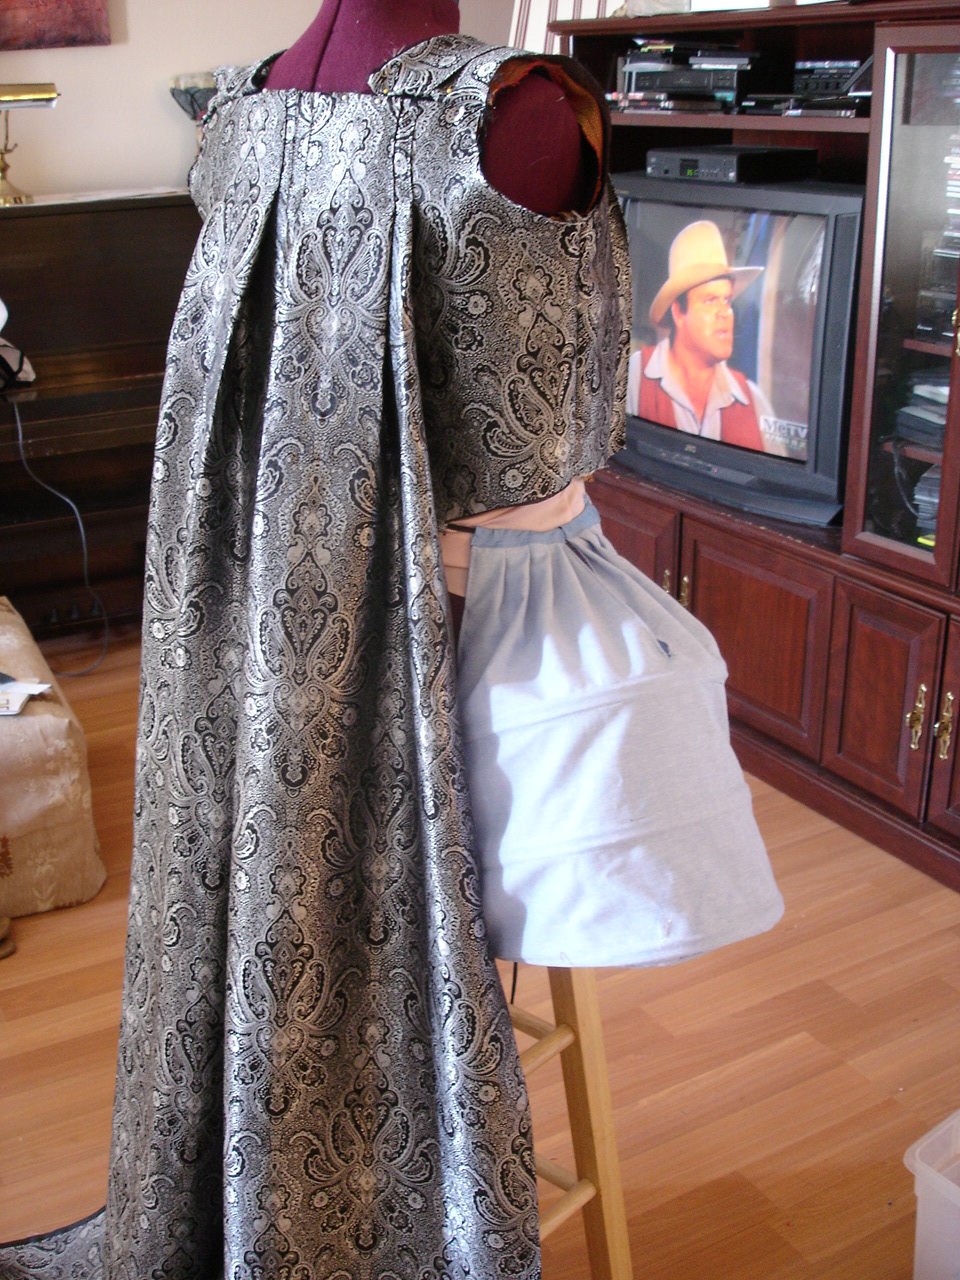
Myth Masque time again!  This year, I went in the opposite direction than last year’s pink Tea with Marie gown.  I decided to go as a more gothic Marie.   I had seen the prettiest silver and black poly brocade fabric at Joann’s and thought it would make the perfect gothic dress.  Since this is a fantasy costume, shiny is perfect!

The fabric was $10 a yard and I needed around 12 yards.   $120 = NOT affordable.   I waited for a sale.  Finally, I hit a 40% off sale - and had a coupon for an additional 15% off!  This made it $4.50 a yard, For a total of $54.  I had a $25 gift certificate, so I ended up paying $29.


I again used the Simplicity pattern. This time, instead of closing it down the middle, I made the front of the bodice one piece, and hooked it on the side under the trim. 

I love the a la francaise back. I like the way it bellows out behind you. I had fun pleating it and seeing it take shape on my dress form dummy, named Half-Maude.  She was originally just Maude, but one day I put an extra heavy costume on her, and the legs collapsed.  She now sits on a bar stool.

OH LOOK! BONANZA IS ON!
The sleeves were fun to do.  I used three layers: the brocade for the outer layer, black and silver lace for the center layer and sheer black dotted swiss for the inner layer.  Around the sleeve is a black velvet strip on top of silver lace.  I sewed skull beads around the velvet strip and glued on little diamond bling.

I went to the National City swap meet where they have a fantastic booth full of trim.  I bought pre-pleated, black grosgrain ribbon for $1 a yard.   I also bought 1/8th inch wide silver ribbon and sewed it down the middle of the pleated ribbon. I bought silver gimp trim.  I sewed a lazy S shape down both sides of the front of the over skirt, and sewed the silver gimp at the front edges of the over skirt.  I got six silver roses which I pinned on between the S shapes.

I also bought two big ribbon bows with giant “diamonds” on them for the front of the bodice.


The underskirt was made from black satin, which was a gift. The wig was from Amazon, a steal at $12. Its a vampire wig with pointed bangs which I clipped up underneath the cap.

My headpiece was fun!  It was a headband with black and silver roses, feathers, a tiny pirate hat and a silver skull attached.  It was made by my friend, Seven Deadly Sins, Inc.  I had in my possession from a previous costume a pirate hat with a ship attached.  It fit Mr. Skull perfectly!  So I added that.  

The mask was also from a previous costume, and I used silver eyeshadow on my eyes as well as my lips!  Black and white feather fan I have had for several years. 


Dress Cost Breakdown:

$29     Fabric
$10     10 yards pleated black ribbon $1/yd
$2.50  10 yards thin silver ribbon  25cents/yd
$4        8 yards silver gimp  50cents/yd
$7.50   6 silver roses  $1.25 yd
$5        15 skull beads
$3        2 bows with large "diamonds"
sleeve layers and bodice lining - stash scraps

TOTAL $61


Here are some photos of the final product.

THIS WAS ACTUALLY AT THE END, RETURNING TO THE HOTEL AT 2 A.M.

 
Photo by Kelly Varner.  With Joanne W.
Photo by Kelly Varner.
Photo by Debbie Boyd