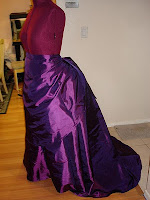
I love to make Victorian gowns. I really wanted to make a luxurious silk dupioni gown with special beaded trims. Did I have a couple hundred dollars? No. I could only spend about $50 to do the whole thing, and this amount had to be spread over two or three months. This is how I did it.
I chose Truly Victorian patterns from the Natural Form period (1877-1882). The skirt is TV225 (1878 Fantail Skirt) and the bodice is TV422 (1881 Dinner Bodice).
On a shopping trip to downtown Los Angeles’ fabric district, I found some beautiful silk dupioni for about $12-$14 a yard. Not gonna happen. I needed about 8 yards, which more than doubled my entire budget for the whole project. Then I found some pretty sea foam green polyester dupioni at LA Alex, and it was only $4 a yard! It has a similar, slubby look like real silk.
Down the street is Target Trim, a gigantic warehouse literally stacked to the ceiling with every trim imaginable. I found a beautiful aqua beaded trim on black sheer ribbon for only $1.50 a yard. I just needed it for around the neckline and wrists, so I got 2 yards.
For around the bottom of the trained skirt I wanted two rows of black lace. In Trim Expo I found a pretty vintage floral style, 3 inch wide lace for only $1 a yard. I bought 8 yards. It was quite plain next to the beaded trim I bought for around the neckline, so I bought a pack of beads at Michaels with a 50% off coupon. My friend and I were watching a movie, and we each started on one end, sewing a bead in the center of each flower. By the end of the movie we met in the middle, and the beading was complete!
SKIRT
Cutting out the skirt proved to be very trying. I have never had a problem with Truly Victorian patterns, until now. The skirt itself was simple to make, but most of the pattern pieces were mis-marked! First, they were all titled "Underskirt" which it isn’t. There were two different-shaped pieces marked "B - Side - Cut 2". After cutting out both pieces, I discovered that one was actually supposed to be marked "Front, Cut one on Fold". I was very glad I had enough fabric to squeeze out a new front piece!
Once I figured out the correct names for the pattern pieces, it went together like a dream. To make the fantail, there is a cord that runs through double fold bias tape sewn inside the skirt, near the back of the knees. I used a bit of left over bias tape (in lime green, but who sees it) and inserted a piece of cording. Pull tight and down to about 10 inches across and tie the cord. Makes the train fan out beautifully!
I used some polyester horsehair braiding in the hem which sure made a difference. Makes the hem stand on its own better, so it doesn’t collapse inward.

Next, I went around the bottom twice with the black 3 inch trim. This also made the hem stand out by giving it visual weight. Here is the trim that is going on the hem.
PETTICOAT
Since the skirt fabric was very lightweight, I made a petticoat from the same pattern. I didn't have another $15 to make one, so I went down the street to the thrift store. I bought a full size white sheet for $3. I folded it like fabric yardage and laid the pattern pieces out. There was plenty of fabric, and its perfect for an underskirt! I ironed that ole wrinkly sheet and cut the pieces out.
Helpful tip: Canned veggies that sit in the back of your cupboard for a year (especially lima beans) make the best pattern weights, along with a curious cat.

I made the petticoat an inch shorter than the skirt so it won’t show. The good thing about this petticoat is I can use it for other trained skirts. If the skirt is fuller, I just let out the cord! Speaking of the cord, I didn't have any white bias tape, but I had a white ribbon. I used this and it worked just fine.
Well, here is the finished petticoat and skirt, which was started Friday afternoon and completed Saturday evening. In part 2, I will be making the bodice.


